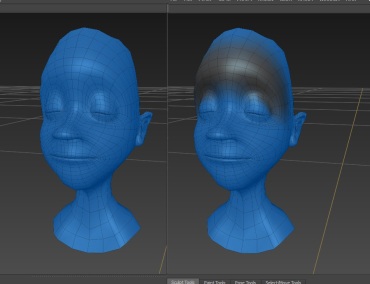
When making my blendshapes I prefer working with Mudbox rather than ZBrush. The only reason is the ease of integration with Maya.
As Maya and Mudbox both are from Autodesk, and both have their free educational versions available to download and use, I just ended up working with Mudbox. I am sure a similar workflow can be established to work with ZBrush as well.
In this tutorial, I will be discussing:
– the most simplest workflow I know of between Maya and Mudbox
– basic tolls you will need to know in Mudbox to do your blendshapes.
– how to get mirrored shapes without using any fancy tools/scripts
1) Open maya scene file and duplicate the base head geometry. You will be making all your blendshapes to this duplicated head. Hide your original model by adding it into a layer if you want.
2) Make another duplicate of this head and name it mudboxHead. We will use this head to make all our blendshapes. I do this because, for whatever godOnlyKnows reason, if the workflow between mudbox and maya gets screwed up, I do not want it to affect my target head.
Remember! 3 heads are better than 1

3) select the mudbox head and navigate in Maya to File-> send to Mudbox -> send as new scene. (I assume that you have mudbox installed)
4) When the file opens in mudbox, you will see it centered in the screen. Hit A on keyboard to frame it.
5) If you have not used mudbox before, fear not. It is a blend of Maya and Photoshop and really easy to pick up. To your right, you will see layers. We are going to use these layers to do all our shapes. I wont go into the details of mudbox basics. You can get that from other tutorials online. I will assume you have a decent knowledge of the interface of mudbox.
6) to your right, you will see the face as a base layer. Lets create a new layer and call it BrowNearDown. thats the shape we are going to create.
Creating the shape itself:
1) I use the freeze tool to freeze areas I know are not going to be affected by the shape. I like this tool as it gives me a clear visual representation of whats being affected and whats not. I can also get a gradient of the affect by freezing the area partially. So, as the first step, lets select the Freeze tool and from brush settings, choose Flood to freeze the entire face. And then lets hold down CTRL button or from brush settings choose InvertFunction and then paint out the area that we want to influence.

2) Now create a later. We will use this layer to build our shape. Note that it is very important to first work on the lowest level of detail. You do not want to work on a high poly mesh right now.
3) Select the Grab tool. The grab tool effectively moves geometry around. It does not add/remove more volume. As such this is the perfect tool for making blendshapes. I tend to keep the brush size fairly large. The face is frozen to make sure only selected areas are affected. Also, we usually want to see a falloff while moving the face shapes. This falloff is built in when we made few areas of the face editable using the freeze tool. So, we can go really big with the brush size knowing that there will be a good falloff.
4) In the brush settings, select mirror by localXaxis (or localY/Z so that other side of the face is also affected). Now sculpt the basic brow down shape. notice that both sides of the face are being affected equally. We are effectively doing our Mirrored Blendshape too.
5) Just try and block out the shape. Do not get into too much detail at this point. Also keep sliding the opacity of the layer from 0 to 100 to see how the shape would work. You will be able to see the crunching of the lines/edge loops better this way.

6) You will notice it doesn’t look right. This is because, I have sculpted just the brow down shape now. In reality, we can never move our eyebrow ends just down. When we do it, the eyebrows also come forward and come nearer. So, we will end up doing all three blendshapes separately. None of them will look right by themselves. But when combined together will produce the perfect shape.
7) I always feel this stage of getting a shapes is probably more closer to a realistic character. Get it to shape how your eyebrows move. Now its time to create a new layer and increase the poly subdivision by 2 levels and start sculpting to exaggerate the expression. In the second layer we just created, just experiment with how much more you can push the shape. Do not go into finer details. Once satisfied, hit PageDwn twice to go back to subdivion 0 to see the changes.

notice that the change is not too great. But definitely more pronounced than earlier. Depending on the style of animation, this expression could be pushed even further.
8) time to make another layer and make the finer details. What happens when the eyebrow goes down… does it create a crease just above the eyelid? could you create some wrinkles? Depending on the amount of detail you need to add, you can bump up the subdivision and sculpt accordingly. In this stage, we are no ,longer looking to move geometry around. Instead we are looking to sculpt. i.e. add extra fat under the eyelids, or carve out some creases, etc. Its a good idea to switch to the sculpt brush now and periodically smooth your work by holding down SHIFT and using the same brush to see what you are doing.
My model is not very high poly and I dont plan on adding the wrinkles in the geometry. But, I can definitely add the wrinkles as a displacement map. I will do this if I think I need it in my film. For now, I will stop here and move onto the next shape.
Change of shape:
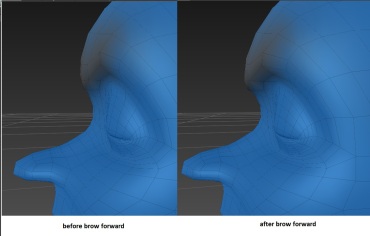
The shape I am ultimately trying to get to is the brow scrunch down/squeeze. As I said, we need 3 shapes to add up to do this. We have just built the first of these shapes. We will now build the second, brow forward.
1) Make a new layer in the same scene file. As discussed in the sculpting steps above, sculpt out the brow fwd shape, while still keeping the visibility of the brow down shape ON.

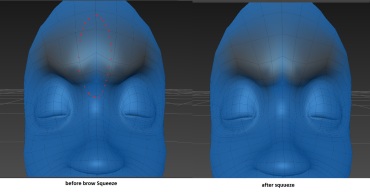
2) I will make another layer for the brow Squeeze shape and do the exact same steps.

notice how to get the brows to squeeze together I selected my freeze brush and painted the center line of the brow flowing into the nose, That way, I preserved its position and using the grab tool moved one side of the brow closer to get the squeeze. I also added some details in a higher poly layer.
Extracting the shapes:
If you are still reading this, then you are pretty serious about learning this stuff 🙂
so lets move on. We have all the perfect eyebrow squeeze shape by the addition of the 3 shapes. Now to get them all into maya as separate shapes.
There are two ways to do this.
1)in mudbox, just hide the visibility of the browSqueeze and browFwd layers. We now only have the browDown shape.
method1: With the shape selected, navigate in mudbox File-> send to maya -> add to selected scene. This will add this shape as anew shape into maya.
method2: at the bottom right corner in mudbox, you will see a status message… “connected to maya.. update”. Click on the update button. This obviously requires that your Maya is still open. The mudbox head we had created initially will now take the shape of browDown. You can duplicate this head and rename it as the shape.
2) switch OFF all layer visibilities and switch ON only the browFWD layers. now send it to maya following either of the 2 techniques.
3) do the same for the other shape.
So, in very simple steps, we have isolated the shapes and sent them to maya. We still need to separate these out as Left and Right shapes.
NOTE:
it is good to make additional shapes here. Like if you want the squeeze shape with a greater emphasis to be used in a very powerful scene, then make that as a separate shape. You can always add that shape ON when needed.
Once we have all the shapes in Maya, your scene file should look similar to this:

Select all the new shapes created in mudbox, then the mudboxhead and create a blendshape. Test to see if all the shapes are working as needed. Its a good idea to test this in smooth mode. You will see problems with the shapes easily and mostly might have to go back and forth between mudbox and maya a little bit to get it right. If you do feel like a particular shape needs to be toned down, adjusting the layers opacity in mudbox will not work. This is because, when you send the model ot maya, it is sent with full opacity. So, you will have to sculpt down the layer manually. Thankfully, this is very easy to do. Select your erase tool in maya. and start painting. It basically erases the change you have done on that layer on parts that you are painting. To partially erase away, use the freeze brush first and paint with a faint opacity. That way you can get the erase brush to work in gradients.
Mine looks something like this when all this is done.

Separating into Left and Right shapes:
Its time to separate them out without using any scripts/tools.
Select the mudbox head that has the blendshapes on it. Select the Paint blendshapes weight tool. This tool basically allows you to select regions of the geometry that are being affected by the blendshape. We are just going to select one side of the face and say, Do not affect by any blendshape. then save all the resulting shapes as Left… do the same for the other side and save it as Right.
In more detail:
1)Select the mudboxHead and then go to paintblendShapeWeihts tool. If you did that right, your model will turn white. In the tool settings, you will see the name of the blendshape node and the blendshapes listed. Select the node. and in Value of brush, set to ZERO, and opacity to 100, click on Flood. the face turns black and will look like the default shape. No matter what you do with the slider, its not going to change shape.

2) hit W or go into a component mode. In front view, select verts from only one side of the face. Do not select also the center line. Go back to PaintBlendShapeWeights tool. now change value to 1 and Flood again.
3) Test it out.

oneSideBlendshape
Thats it! Follow the exact same steps to get the other side. Very simple and uncomplicated technique. You could also do the other side with a script.
So, its good to know both the techniques. I prefer using the script to get the other side. just because I can take a break and let the computer do all the work. I can email you the script I wrote to get the blendshapes mirrored. Its in beta stage. It works perfectly, but I have not developed a GUI for it yet. You just need to select all shapes you need to mirror, then the base shape and run the script. Come back in about 15 minutes(depending on number of shapes to mirror) and all your 40 odd shapes will be mirrored with an offset and renamed accordingly.
Have fun. Let me know if you find any better techniques to do all this. Knowledge is more fun when shared.

